Connections API
In this section, the implementation language is connected to the development platform Swagger. This document shows examples using Swagger, which is the interactive online environment. Therefore, all the terms used such as “click on execute” are Swagger-specific. The integration of the WeFitter API to your platform follows these steps:
- Authorization
- Profile creation
- Connection- To create a connection between your UI and the API
- Get data- To pull users data by using the proper endpoints.
- Implement Gamification
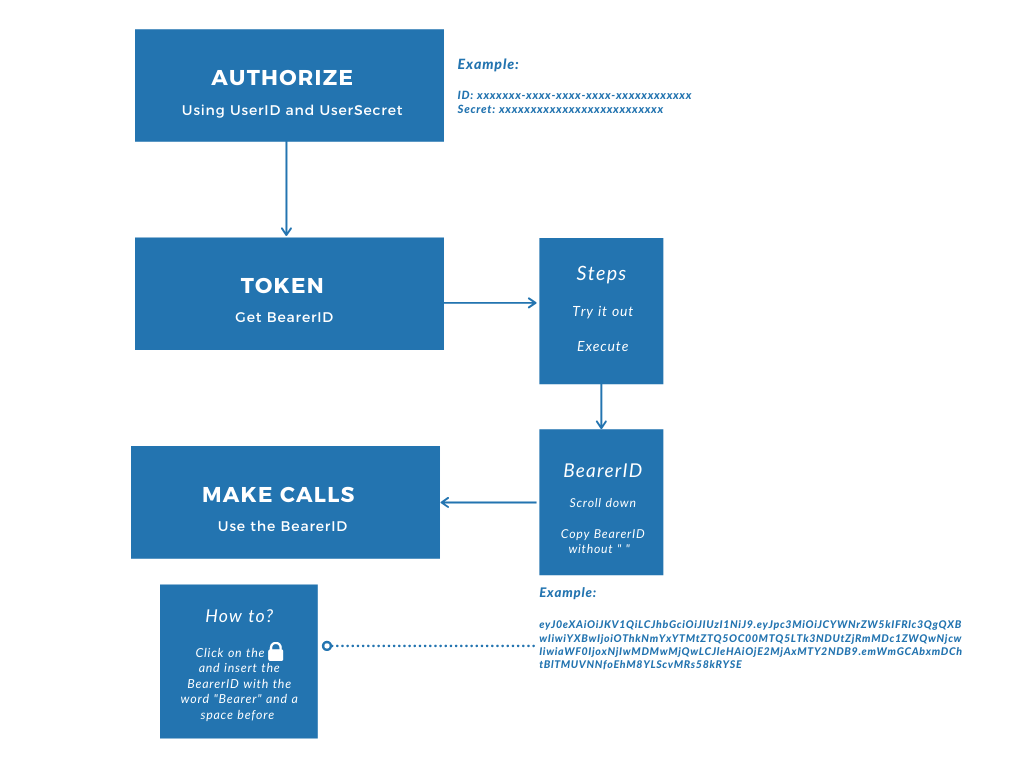
Authorization in the form of Bearer and Profile token are needed to perform actions in the API.
The flowchart below shows the steps you will perform when going through the authorization stage. You (your organisation) have received a ClientID and a ClientSecret. With your ClientID and ClientSecret, you can create an administrator bearer that you need to authorize most API calls. For authorization of API calls for public profiles you need a profile bearer, which is described later in this section.
Note: It is important to keep your ClientId and ClientSecret secure and safe. These credentials cannot be retrieved at a later stage.
Bearer types and authentications
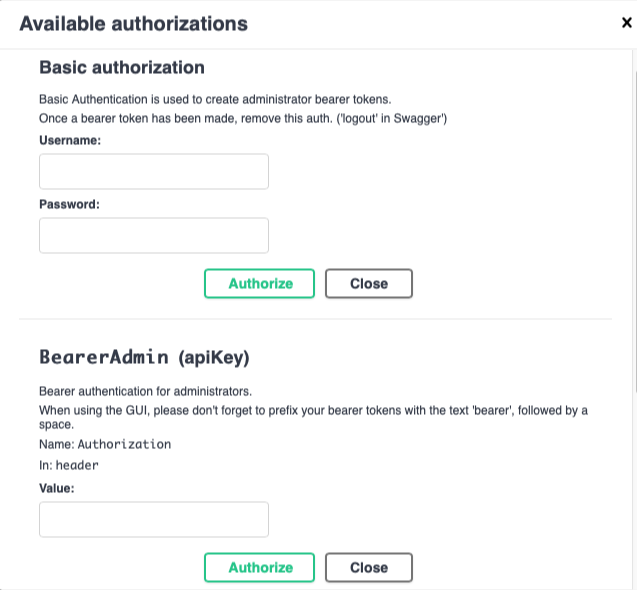
The WeFitter API uses distinctive authorizations for different functions. The first authentication type is the Basic Authentication, which is used to create administrator bearer tokens. Once a bearer token has been made, remove this authentication (for the Swagger environment, you need to ‘log out’).
|
Security Scheme Type |
HTTP |
|
HTTP Authorization Scheme |
basic |
|
Group |
API Call |
Authentication |
|
Token |
Create Token |
Basic |
The second authentication type is Bearer Authentication for administrators. When using the GUI, please don't forget to prefix your bearer tokens with the text 'bearer', followed by a space. It is important to note the fact that the Admin Token key is available for only 24 hours. After this time limit, you will have to requesta new token.
|
Security Scheme Type |
API Key |
|
Header parameter name: |
Authorization |
|
Group |
API Call |
Authentication |
|
Profile |
Create Profile |
BearerAdmin |
|
Profile |
Create Event |
BearerAdmin |
|
Challenge |
Create Challenge |
BearerAdmin |
|
Challenge |
Edit challenge |
BearerAdmin |
|
Challenge |
Partial edit challenge |
BearerAdmin |
|
Challenge |
Delete challenge |
BearerAdmin |
|
Challenge |
Add members |
BearerAdmin |
|
Challenge |
Add members |
BearerAdmin |
|
Challenge |
Remove members |
BearerAdmin |
|
Team |
Add members |
BearerAdmin |
|
Team |
Add members |
BearerAdmin |
|
Team |
Remove members |
BearerAdmin |
The third authentication type is the Bearer Profile authentication. This is used for logged-in profiles. When using the GUI, please don't forget to prefix your bearer tokens with the text 'bearer', followed by a space.
|
Security Scheme Type |
API Key |
|
Header parameter name: |
Authorization |
|
Group |
API Call |
Authorizations |
|
Profile |
Activity Segment |
BearerProfile |
|
Profile |
Bio Metric |
BearerProfile |
|
Profile |
BMI |
BearerProfile |
|
Profile |
Daily Summary |
BearerProfile |
|
Profile |
Daily Summary Sample |
BearerProfile |
|
Profile |
Event |
BearerProfile |
The WeFitter API uses specific authentication types for specific API calls. However, there are some calls that can be made using either the Bearer Admin credentials or the Bearer Profile authentication. The same advice of using the GUI is applicable, therefore make sure not to forget to prefix your bearer tokens with the text 'bearer', followed by a space.
|
Group |
API Call |
Authorizations |
|
Profile |
List Profiles |
(BearerAdmin) OR (BearerProfile) |
|
Profile |
Delete Profile |
(BearerAdmin) OR (BearerProfile) |
|
App |
Totals |
(BearerAdmin) OR (BearerProfile) |
|
Challenge |
List Challenges |
(BearerAdmin) OR (BearerProfile) |
|
Challenge |
Team learderboard |
(BearerAdmin) OR (BearerProfile) |
|
Challenge |
Team contribution |
(BearerAdmin) OR (BearerProfile) |
|
Challenge |
Get challenge |
(BearerAdmin) OR (BearerProfile) |
|
Challenge |
Leaderboard |
(BearerAdmin) OR (BearerProfile) |
|
Challenge |
Add member |
(BearerAdmin) OR (BearerProfile) |
|
Challenge |
Add member |
(BearerAdmin) OR (BearerProfile) |
|
Challenge |
Remove member |
(BearerAdmin) OR (BearerProfile) |
|
Challenge |
Get members |
(BearerAdmin) OR (BearerProfile) |
|
Challenge |
Periods |
(BearerAdmin) OR (BearerProfile) |
|
Team |
List teams |
(BearerAdmin) OR (BearerProfile) |
|
Team |
Create team |
(BearerAdmin) OR (BearerProfile) |
|
Team |
Team |
(BearerAdmin) OR (BearerProfile) |
|
Team |
Edit team |
(BearerAdmin) OR (BearerProfile) |
|
Team |
Partial edit a team |
(BearerAdmin) OR (BearerProfile) |
|
Team |
Deletes a team |
(BearerAdmin) OR (BearerProfile) |
|
Team |
Add member |
(BearerAdmin) OR (BearerProfile) |
|
Team |
Add member |
(BearerAdmin) OR (BearerProfile) |
|
Team |
Remove member |
(BearerAdmin) OR (BearerProfile) |
Generating the administrator bearer
Initiate Swagger on https://api.wefitter.com/api/v1.3/swagger and press the Authorize button. This will lead you to a pop-up window. Enter your CientID as Username and ClientSecret as Password and press the upper green Authorize button. Then press Close.
Now, you need to create the token (administrator bearer).
Go to POST /token/ Create token and click the button Try it out. Next, click on Execute.
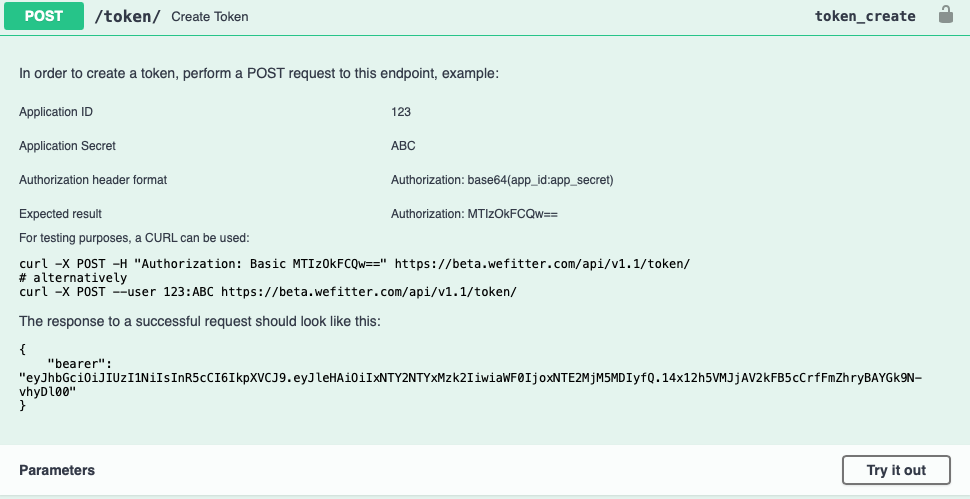
By completing this action, you will get a result including the administrator bearer. The administrator bearer is listed in the response body.
Now, you need to copy the bearer to the clipboard. This will be used in the next steps.
You need to scroll to the top and press Authorize to popup the window, following the next steps:
- Logout from Basic Authorization
- In the Bearer (apiKey) Value field write ‘Bearer’ plus space + the bearer you copied to the clipboard
- Press Authorize.
You will now be able to access all API which need this administrator bearer for authorization.
A practical example:
List Profiles: what you see before and after you make the call in Swagger

Here you can find the correlating documentation on https://api.wefitter.com/api/v1.3/redoc/
Profile
Creating the profile
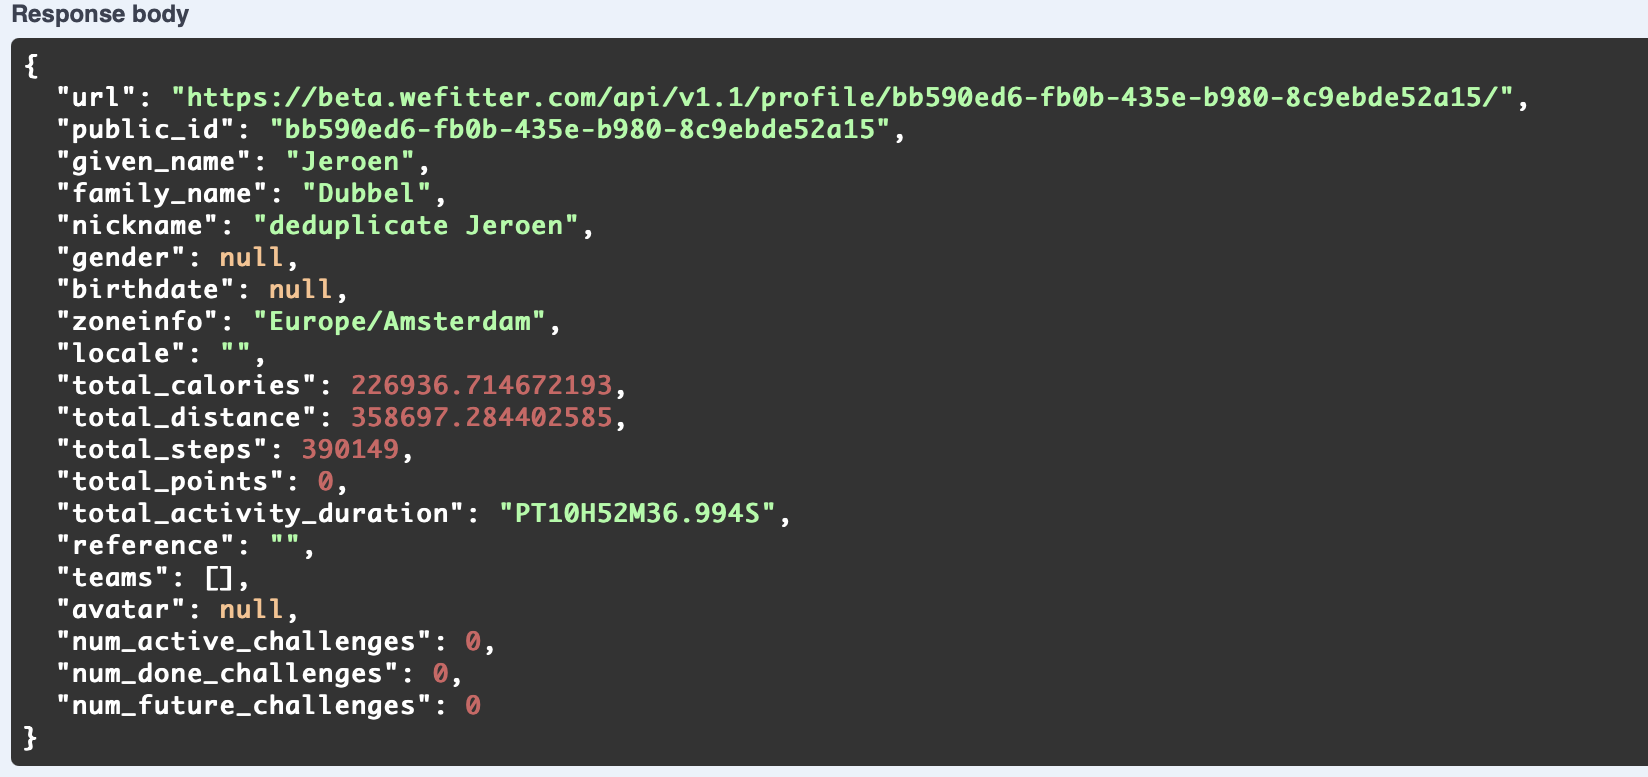
This function will allow you to create, access and model the profile(s) of the users.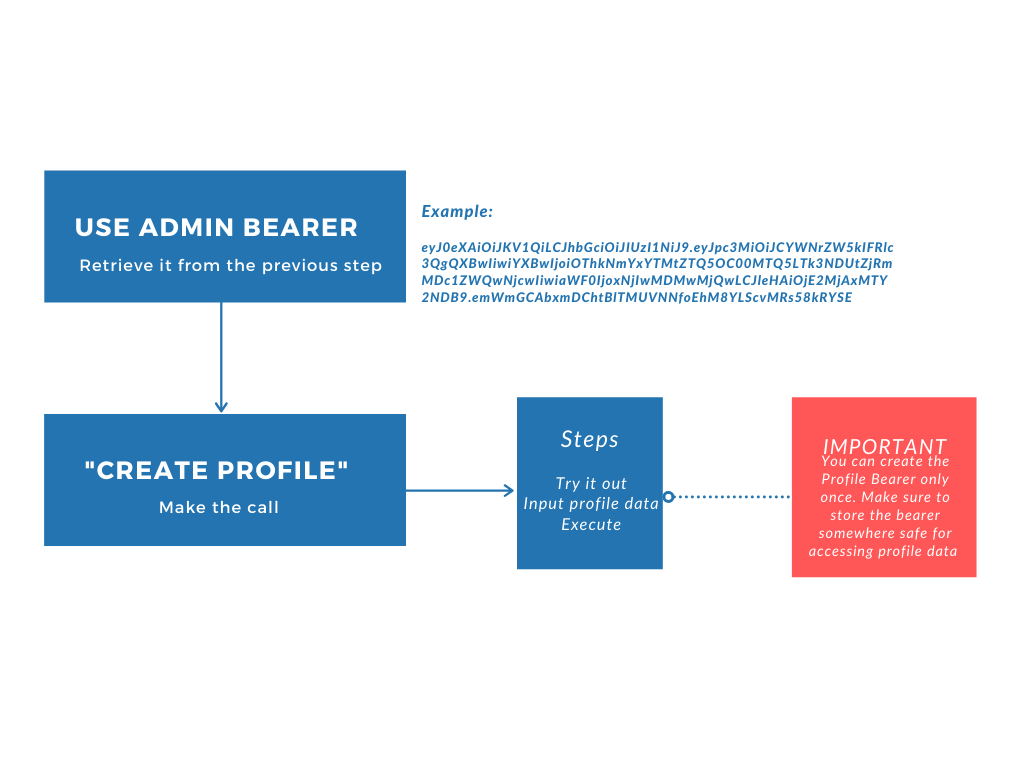 You need the administration bearer to create a new profile. Note that the response of creating the profile give you a bearer: the profile bearer. This profile bearer is generated when the profile is created, and you need to store this bearer as it can NOT be retrieved later anymore.
In the illustrations below, you can see a practical example of the API call with an example bearer.
In order to access the profile, you need to put the profile bearer in the Authorization window.
Copy the bearer from the response, scroll to the top and press Authorize to open the Authorization window, press logout and then put the word ‘bearer’ followed by a space and followed by the profile bearer in the box. Then press Authorize.
Accessing the profile
Now you have access to the public profile.
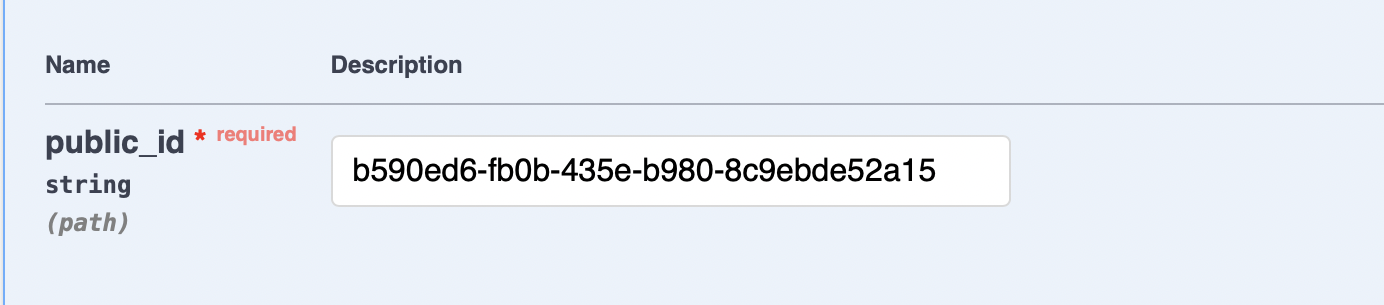
Read the profile as follows: Press ‘try it out’, fill in the public_id from the profile (see response from profile creation).
Connections
The next step in the integration process is to make a connection with the wearable devices. The calls can be used for both the App and the Web application. The main difference to be noted is that it’s a predefined piece of HTML or Json data. The Json response is the preferred and most flexible way of working with the WeFitter App Connections
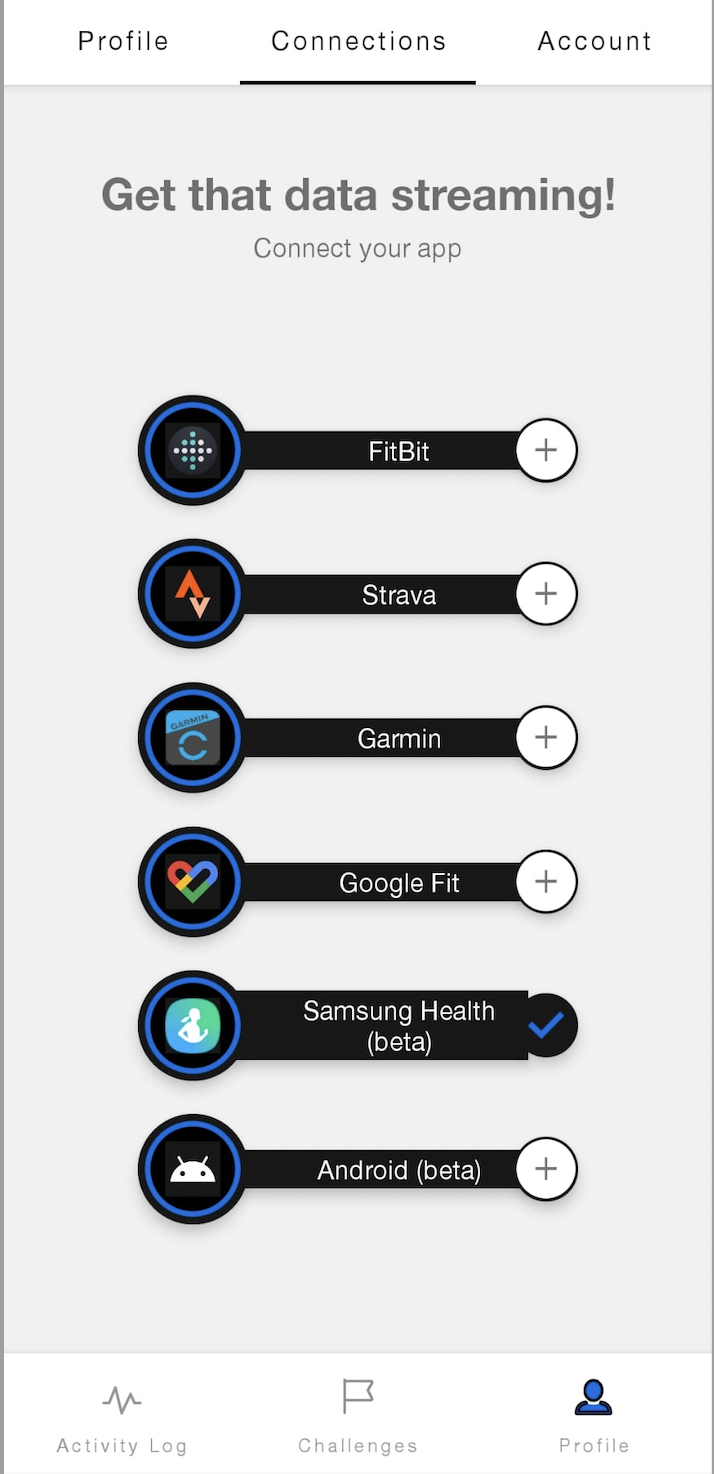
The above image is an example from the WeFitter demo App.
In the process below, we will demonstrate on how you can get the backend calls for this screen.
How to:
1) Use the ‘profile bearer’
2) Go to GET/profile/{public_id}/connections/, press the button Try it out.
3) Press Execute and you will get the following: The profile bearer is listed in the response body.
4) In the response, you can see the URLs for different connections. Test one of the URL. It is important to note the redirect parameter, which allows the API call to return a redirection to the specified URL for the connection.
5) You can use each of these URL to implement in the connection screen.
Web application connections
If you are using a web application, please follow the following steps.
1) Use the ‘profile bearer’.
2) Go to GET/profile/{public_id}/connection_widget/ press the button Try it out.
3) You can test the URL and use them to implement the connection screen.
Connecting with Apple Health
We provide an SDK to make a connection with Apple Health. Hence, it is only possible to make a connection of Apple Health with a mobile application and not with a web application.
Please contact api-support@wefitter to provide you with the SDK kit. The instructions are attached in the zip file that we share with you.
Connecting with Samsung Health
We also provide an SDK to make a connection with Samsung Health. Therefore, similar to the Apple Health connection, it is only possible to make a connection of Samsung Health with a mobile application and not with a web application.
Please contact api-support@wefitter to provide you with the SDK kit. The instructions are attached in the zip file that we share with you.
Pull data
If you want to have data pushed from the wearable/app, please go to the Webhooks section.
The API provides the way to pull the data of the users. The data is always raw, however logical representation in form of graph can be made from the available data.
Raw data, in this context, refers to the data that is not collected and aggregated by WeFitter directly, buy is collected after the aggregation process of another app or wearable.
To give you a better insight of the function, we would like to present some practical examples.
Implementation example 1: The adjacent graph shows information like step counts, distance tracked and workouts for a particular day. 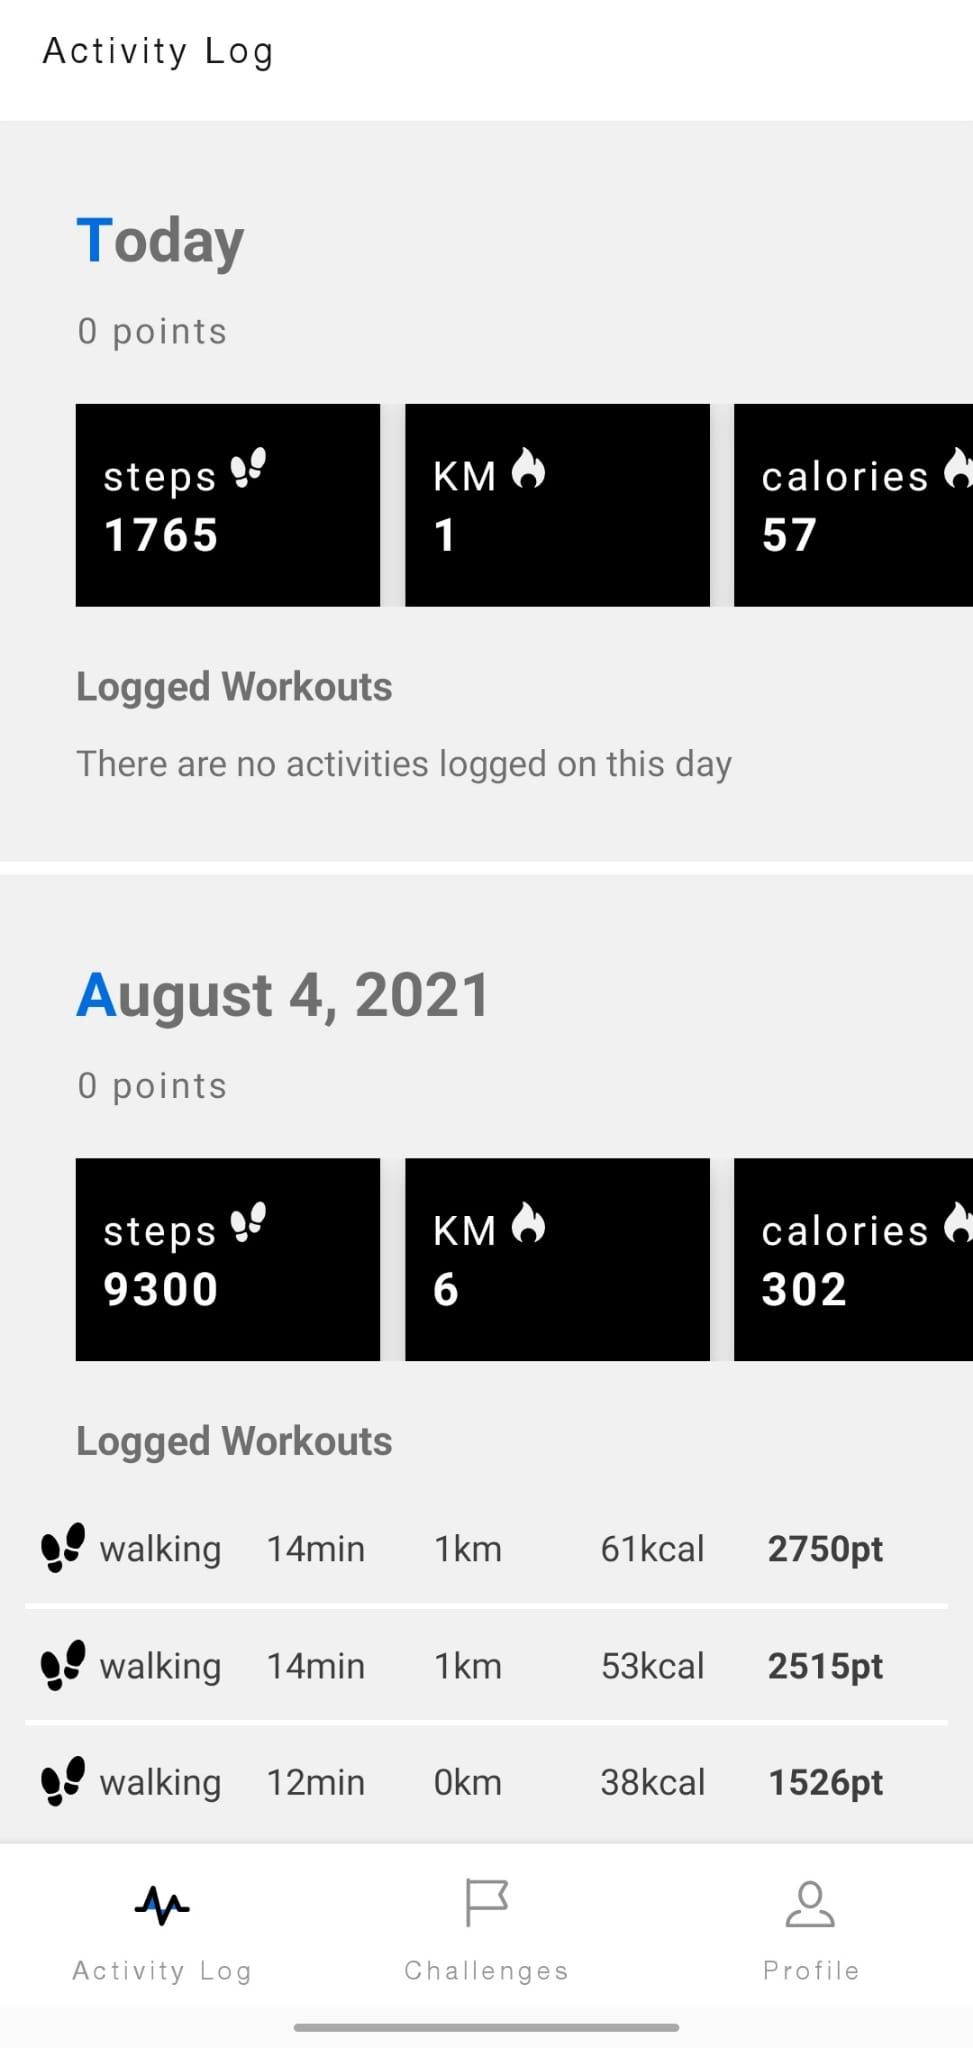
To pull such information, you can follow the steps below:
Steps:
1) Use the ‘profile bearer’ and make sure it is authorized.
2) Get the workout - UseGET/profile/{profile_public_id}/workout/, press the button Try it out. Fill in the public ID for certain profile. You can filter on the start_date and end_date to filter on different dates.
3) In response, you will see the list of workouts performed by the profile.
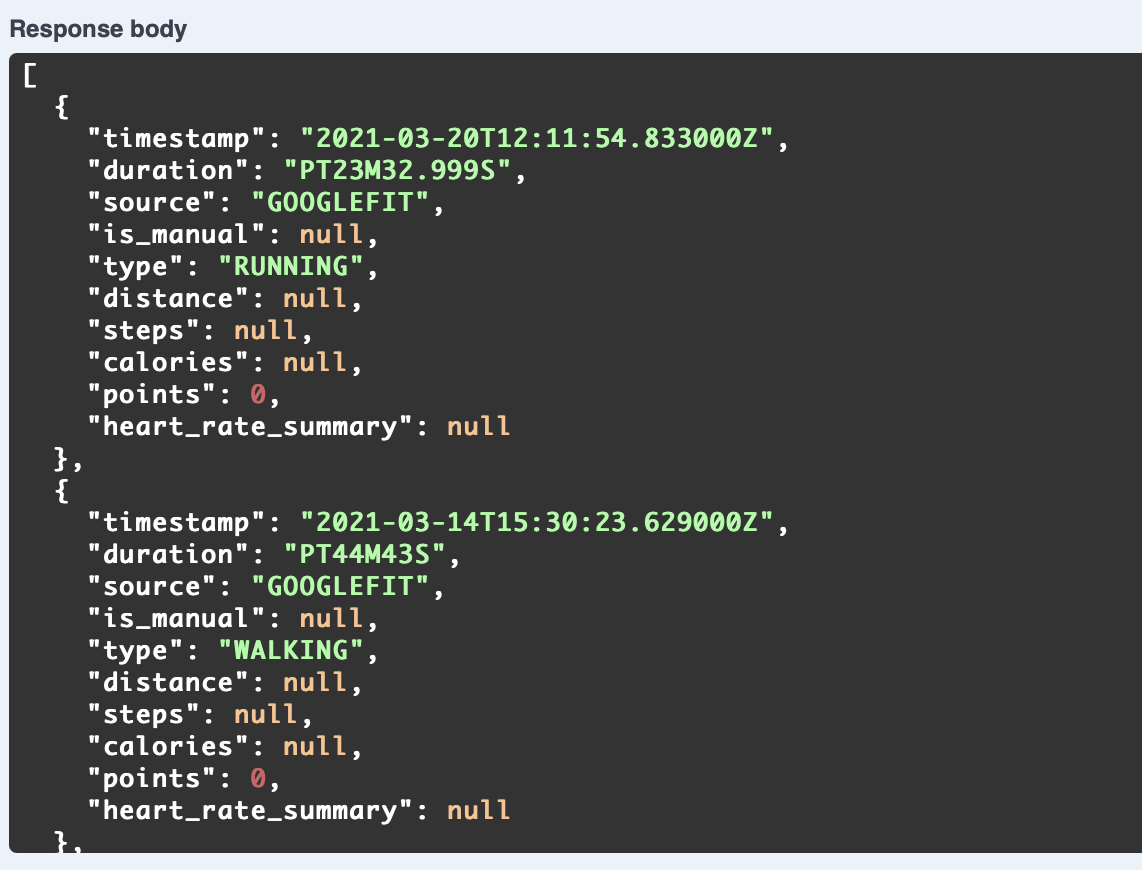
4) You can implement this response to show list of workouts per specific date
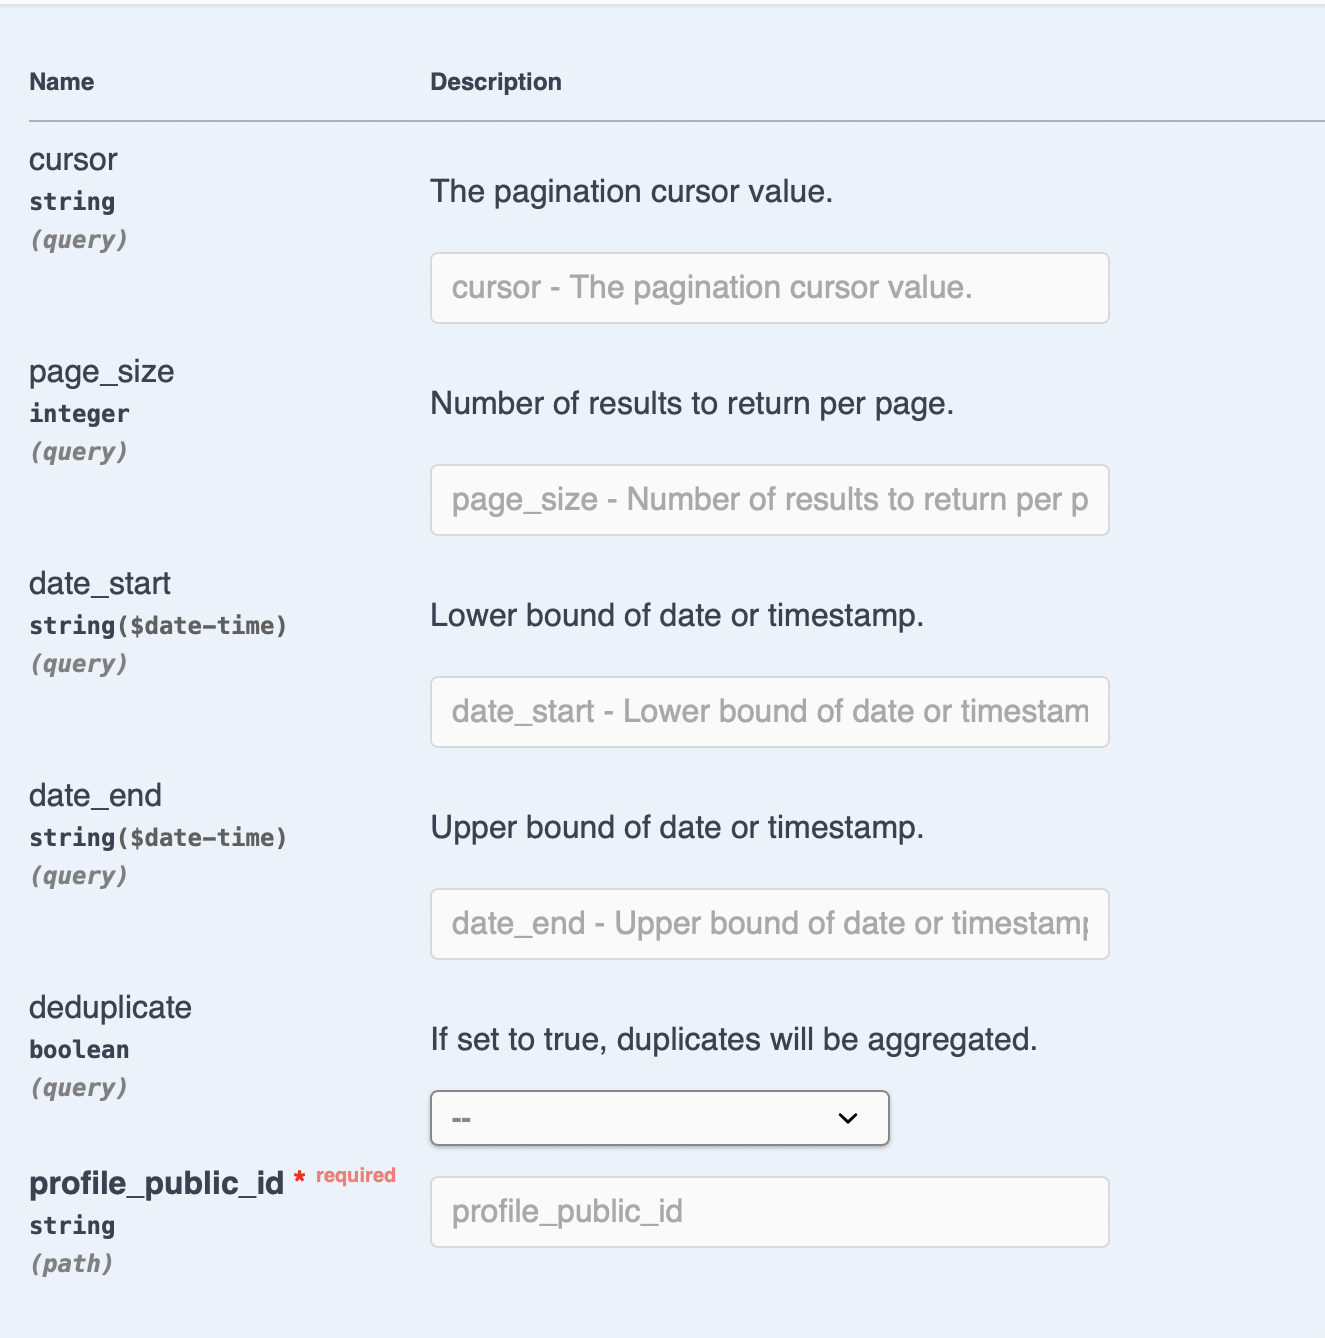
5) Get daily summaries - Use should use GET/profile/{profile_public_id}/daily_summary/
Daily Summary. Press the button Try it out. Fill in the public ID for certain profile.

6) The response will provide you with daily summary of an user based on each day.
Implementation example 2:
Another way in which data can be showed is through graphs that monitor daily, weekly and monthly progress for distance, calorie counts, step counts and workous.
Steps:
1) Use the ‘profile bearer’ and make sure it is authorized.
2) Get the workout - UseGET/profile/{profile_public_id}/workout/, press the button Try it out. Fill in the public ID for certain profile. You can filter on the start_date and end_date to filter on different dates
Here, you can insert an enddate and start date, and you can also limit the responses on page size.
3) In response, you will see the list of workouts performed by the profile.
4) You can implement this response to show list of workouts per specific date.
5) Get daily summaries - Use should use GET/profile/{profile_public_id}/daily_summary/
Daily Summary. Press the button Try it out. Fill in the public ID for certain profile.
One of the parameters here is the cursor, which is the pagination value (page number). The page size allows the limitation of return values.
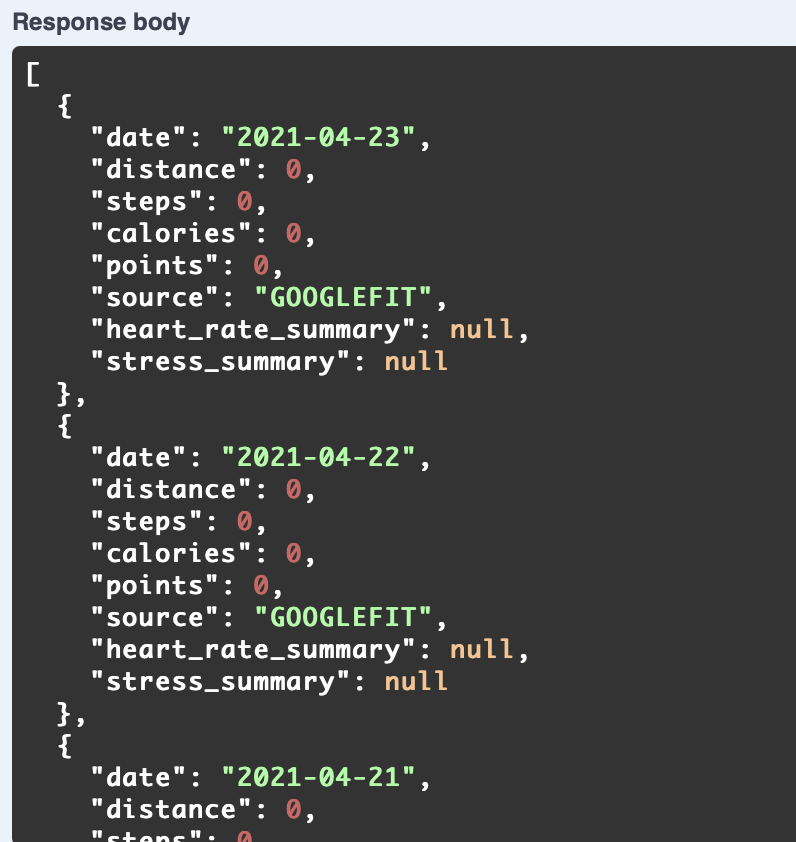
6) The response will provide you with distance, steps, calories of a user based on each day. You can create a graph using these values.
Example body: {
"date": "2021-02-02",
"distance": 3178.550847053528,
"steps": 3966,
"calories": 2051.5490168399406,
"points": 0,
"source": "GOOGLEFIT",
"heart_rate_summary": null,
"stress_summary": null
},
Push data
The push data "push endpoint" function is applicable only for API clients.
API clients can use the push endpoints to fill in an endpoint URLs of their own enpoints (picture below) in order to get specific data pushed. The version field determines how the selected data is being serialized, mirroring the API data model.
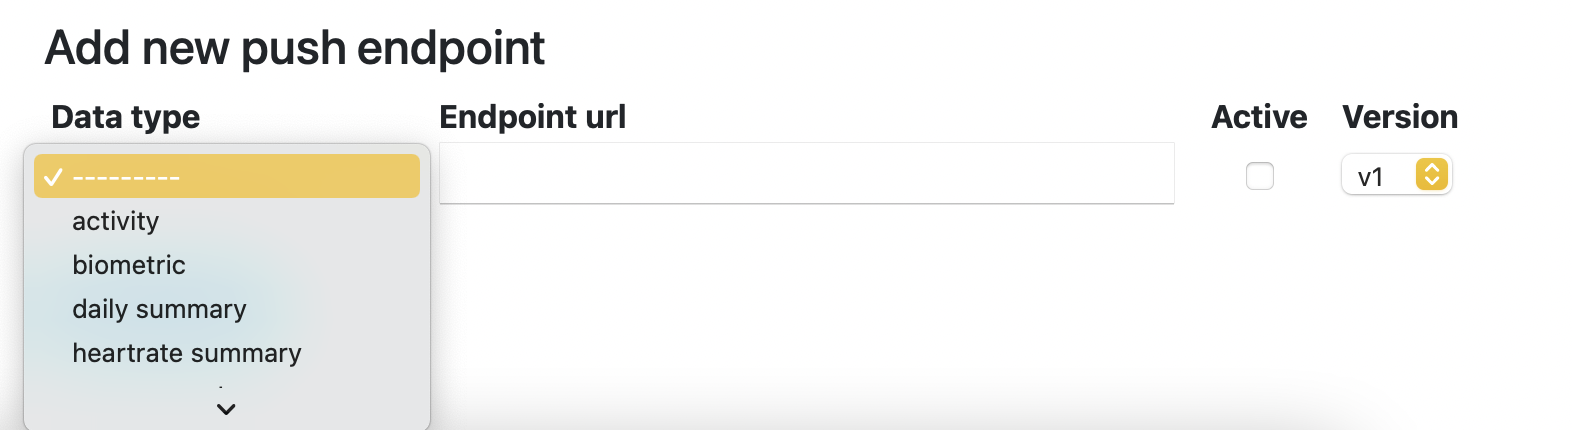 The push endpoint can be accessed through the WeFitter Dashboard, as part of the App definition tab. For more information, please consult the Dashboard Guide.
Note: it is important to understand the role of data deduplication in the Push Data stream. As the data is pushed from the moment it is available throuh the WeFitter API, the same workout from multiple connections might be pushed. The client will receive two workouts, but, from that moment onwards, the WeFitter API has the ability to deduplicate.